
.webp)
A Guide to Managing your Courses and Community, All in One Place
Choose a course-building platform that simplifies your life.
Why invest in something if it’s not going to make your life easier? Especially when it comes to your income. SocialGlow is a platform you can start using the moment you join. There’s a minimum learning curve, and it’s ready for you to use in however serves you and your business best. You won’t have to waste time tinkering to get your business running smoothly. Add your courses, invite your clients, and you’re off to the races.
This article will show you how SocialGlow will make your life easier by managing your courses and community all in one place!
#1 - Groups
Groups are the backbone of SocialGlow. Courses are made to supplement Groups, not the other way around. It may sound counterintuitive, but since SocialGlow is a community-forward course-building platform, the relationships with your clients are prioritized over the mere selling of knowledge, giving you an edge in the course-selling world. This is because the course-selling business model is a customer buying something informative, not transformative. It’s the customer’s responsibility to do something with the information you’re providing. In contrast, a coaching model has a student working with you to achieve a specific result, a transformation, and you are responsible for guiding that process as a coach.
But with SocialGlow, you can combine the coaching and course selling model to give your clients an experience they cannot get anywhere else. Moreover, SocialGlow allows you to do both with less effort because communities build upon themselves. So no matter how you use SocialGlow, your clients will always have a built-in support system provided by the platform, rather than building online communities from scratch.
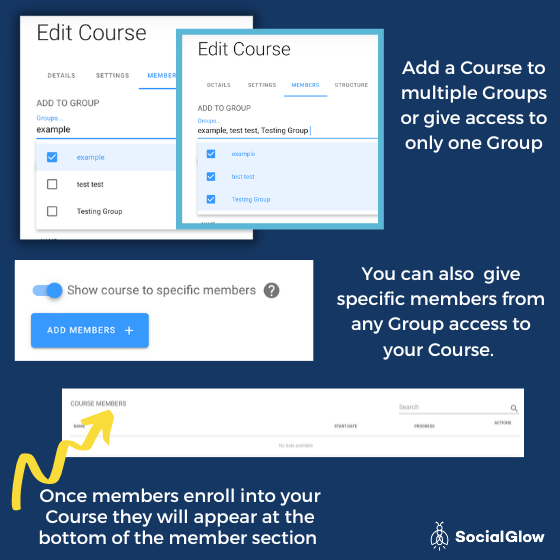
You can add unlimited Courses to your Groups and the same Course to different Groups. Courses can be reused and duplicated, like a Template, rather than being a digital product with one set point.
If, for instance, you do cohort coaching, AKA group coaching delivered to a 'class' of students who start and end your program together. You can easily reuse the same Course repeatedly while keeping all your cohorts separate.
You would create a new Group for each 'class' of students, and then add the Course to that Group. It'll save you time and keep you organized. You'll communicate, teach and track your classes all in one place. Groups minimize work for you and automate that part of your coaching.
If you want to sell specific courses, where clients buy your Course instead of using it as a supplement to your coaching, you would still create a Group first. Then use that Group to grow over time. You would continue to add new customers to the Group, making it a source of community for your course takers that builds upon itself with minimal work from you.
If you do not want an entire Group to have access to a Course, you can select specific members. It's an excellent option for when you want to advertise a new Course in a VIP or Community Group that you've transferred over from Facebook. Once members from that Group sign up, you can give them exclusive access to it.
Don't worry about getting your social media communities transferred over to SocialGlow. Convincing your followers on those platforms to come to SocialGlow for your exclusive content will be easy. SocialGlow's user experience feels like a Facebook Group. It's an intuitive design that your followers will pick up immediately. Plus, using SocialGlow for your members is free! And unlike social media companies, SocialGlow does not sell members' data to advertisers. So your members get the best of both worlds - the ease and use of social media, but the purity and protection of an exclusive digital space.
It's good practice to check into your VIP Groups and Communities and see who is invested in your content and who is not. Then, send a quick message to your group members with the information on how to find your new home on SocialGlow. You'll be able to weed out anyone who isn't serious about your brand and build an even stronger foundation for your community.
One of the ways SocialGlow helps you manage your courses and community in one place is by providing easy-to-use settings that allow you to customize. For example, when creating a Group, the options in Step 2 are your sharing preferences. You'll turn the toggles on or off based on what you need.
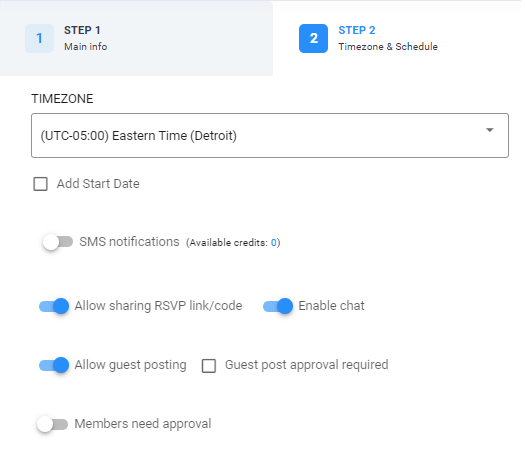
The options include:
- SMS notifications: Send texts directly to your Group members for reminders!
- Allow sharing RSVP Link/code: You can decide whether you want other members to be able to share the Group's link/code. This is helpful if, for instance, you're using your Group as an online community space where your philosophy is the more, the merrier. Or if you want the Group to be closed and only available to the people you've selected.
- Enabling Chat: This will allow the Group members to reach out to the Group and start conversations independently. Or work on projects together.
- Allow Guest Posting: Decide whether you want your members to add their content to the Group.
- Guest Post Approval Required: Decide whether you want to approve members' content before it posts.
- Members Need Approval: Decide whether members can join the Group or be approved by you manually.
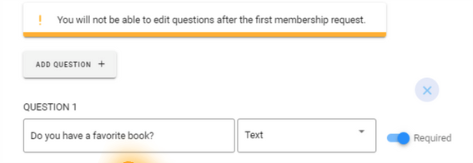
You also have the option here to add Questions. These questions will be given when a new member goes to join the group. It allows you to get to know your clients more without personally reaching out to them.
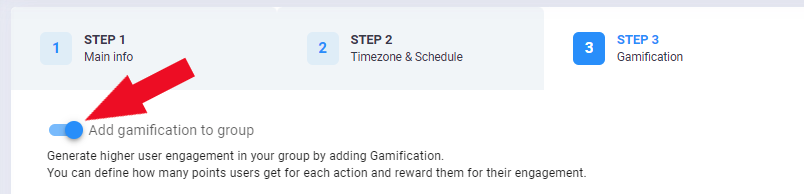
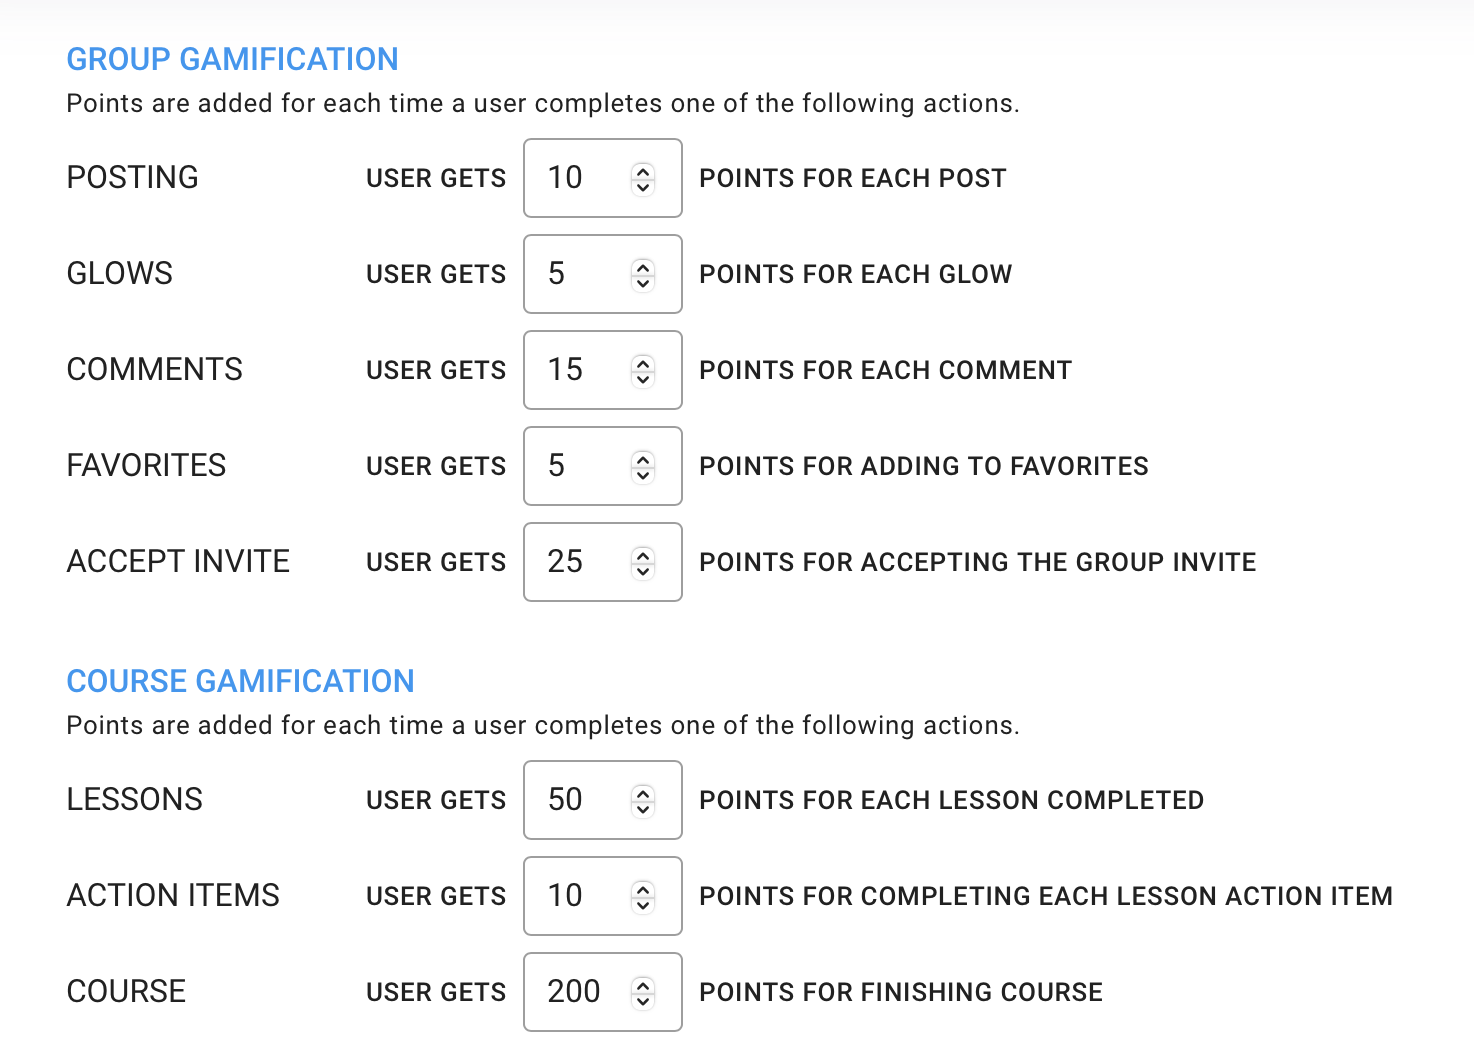
In Step 3 of creating your Group, you can add the Gamification Feature. This feature increases user engagement because it gives all the tasks in the Group, such as commenting, saving favorites, and interacting with other group members, a point value. It’s a simple incentive that makes the user experience more fun and addicting by rewarding your members for their participation. In this section, you will also decide what points to designate to completed tasks in your Courses assigned to that Group.
Once your members begin interacting with your Group and Courses, the points will accumulate onto a Leaderboard.
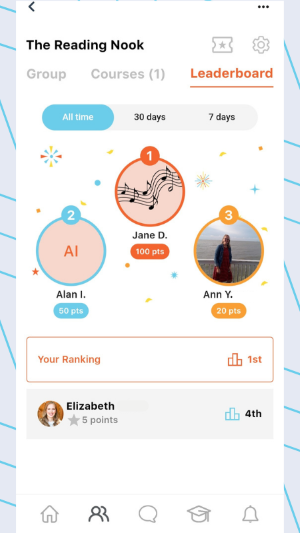
The Leaderboard promotes higher engagement by creating competition within your Group or Course. But it also shows who is participating and who may need extra motivation. Instead of having to check in on each student's status, one at a time, you'll see everyone's progress in one place. How cool is that?
In Step 4 of creating a group, you have access to more options to customize your Group to fit your needs.
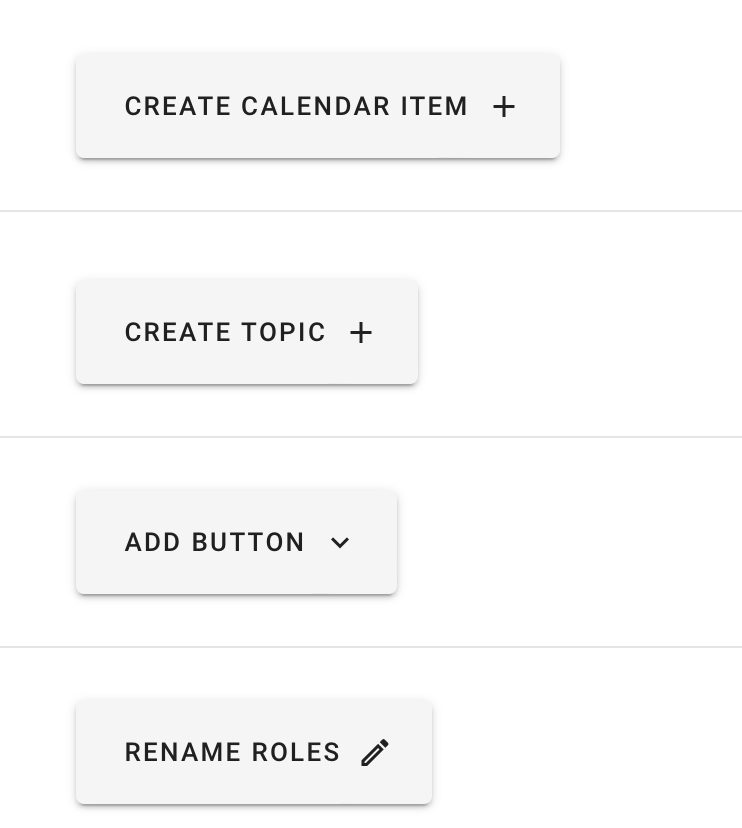
Create Calendar Item Button: This allows you to create an itinerary for your Group. Your Group members are notified at the time(s) selected here. Such as a deadline, times you're planning on going live to answer questions, or even upcoming events your members might be interested in.
Create Topic Button: This allows you to give your members a way to categorize information quickly. Think of it like a hashtag. The Topics will allow you to organize the posts you are adding to your Group, and you can filter the content based on the Topics you created.
Add Button: This allows you to give access to additional resources that you may not want to keep within the SocialGlow network. For instance, your blog, a specific article from another content creator/coach you felt would be helpful, your contact information, or even your paywall page.
Rename Roles Button: if you want to customize the label of the host and co-host of the Group, you can change the role names to reflect your brand better.
No matter which direction you go in for using Groups in your business, you'll be able to take advantage of all these fantastic Features that make running your course and coaching business a breeze. There are so many other things to take care of when you're running your own business - Why choose a platform that will force you to add more widgets and third-party programs to make it flow? Setting up a Group for your Courses is intuitive and straightforward. Communities will thrive when using SocialGlow!
#2 - Courses
Once your Group is customized and ready, you'll want to create your Courses.
All the customization options are right at your fingertips. You won't need to hunt them down or figure out some formula to make it happen. Instead, it's straightforward and to the point.
For instance, a critical customization feature in SocialGlow's Courses is the Drip Settings. It's an optional feature you choose when creating your Course that arranges the content to be released on a schedule rather than all at once.
Your options include the following:
Off: Select this if you want all of your lessons in this Course to be available immediately
Student Enrollment Date: This would start your course rollout when your group member first joins that Group.
On a Specific Date: You can select the date you want your lessons to be available.
Creating your Course's structure is easy through Lessons and Chapters that you can drag and drop into whatever order you want. Chapters break your Courses into smaller sections, whereas Lessons are where all the content for your Course lives.
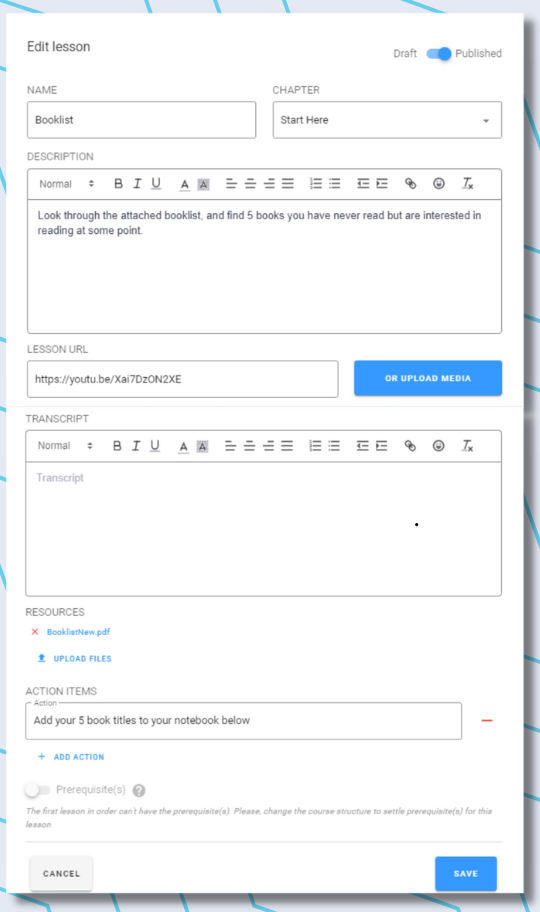
You can add all the content you need for your Course in one place. From PDFs, videos, action items, and even a transcript of your video!
You can also add “prerequisites” to access the Course, only if they’ve finished specific tasks or completed the previous lesson.
#3 - SocialGlow App
Check out what your Course looks like once published on SocialGlow's App.
SocialGlow App is a fantastic resource. You won't have to go through the trouble of creating your own for your clients to access your content from their phones! Once they sign up for SocialGlow, they can access all the resources they need in one place through the convenience of an app. Making it more likely that they will check in regularly. They can take Courses, interact in the Group and collaborate with other members.
Another outstanding feature of the SocialGlow App is the push notifications that pop up when reminders, calendar events, or announcements are made. Notifications will pop up in the banner of their cell phone, so you have immediate access to your client's attention. As a result, communicating with all your clients in one place will be much easier.
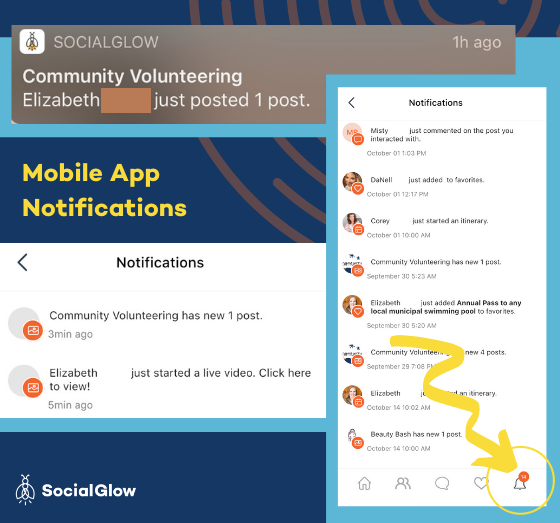
We understand the importance of getting information out there promptly and urgently. That’s why we’ve provided a detailed explanation of every kind of notification SocialGlow provides.
#4 Templates
Templates are a preset format of posts that, once created, can be scheduled in their original form repeatedly. Templates make keeping up to date with your communities easy and duplicatable. For instance, if you have content that needs to be in multiple groups, you can easily schedule it simultaneously.
Plus, if you are using SocialGlow as a Facebook Group alternative, you can schedule content seamlessly without using third-party schedulers, minimizing the tabs you need open on your computer to run your business. Imagine how much less cluttered your day will feel when you can use one program for the most important aspect of your business: Building relationships.

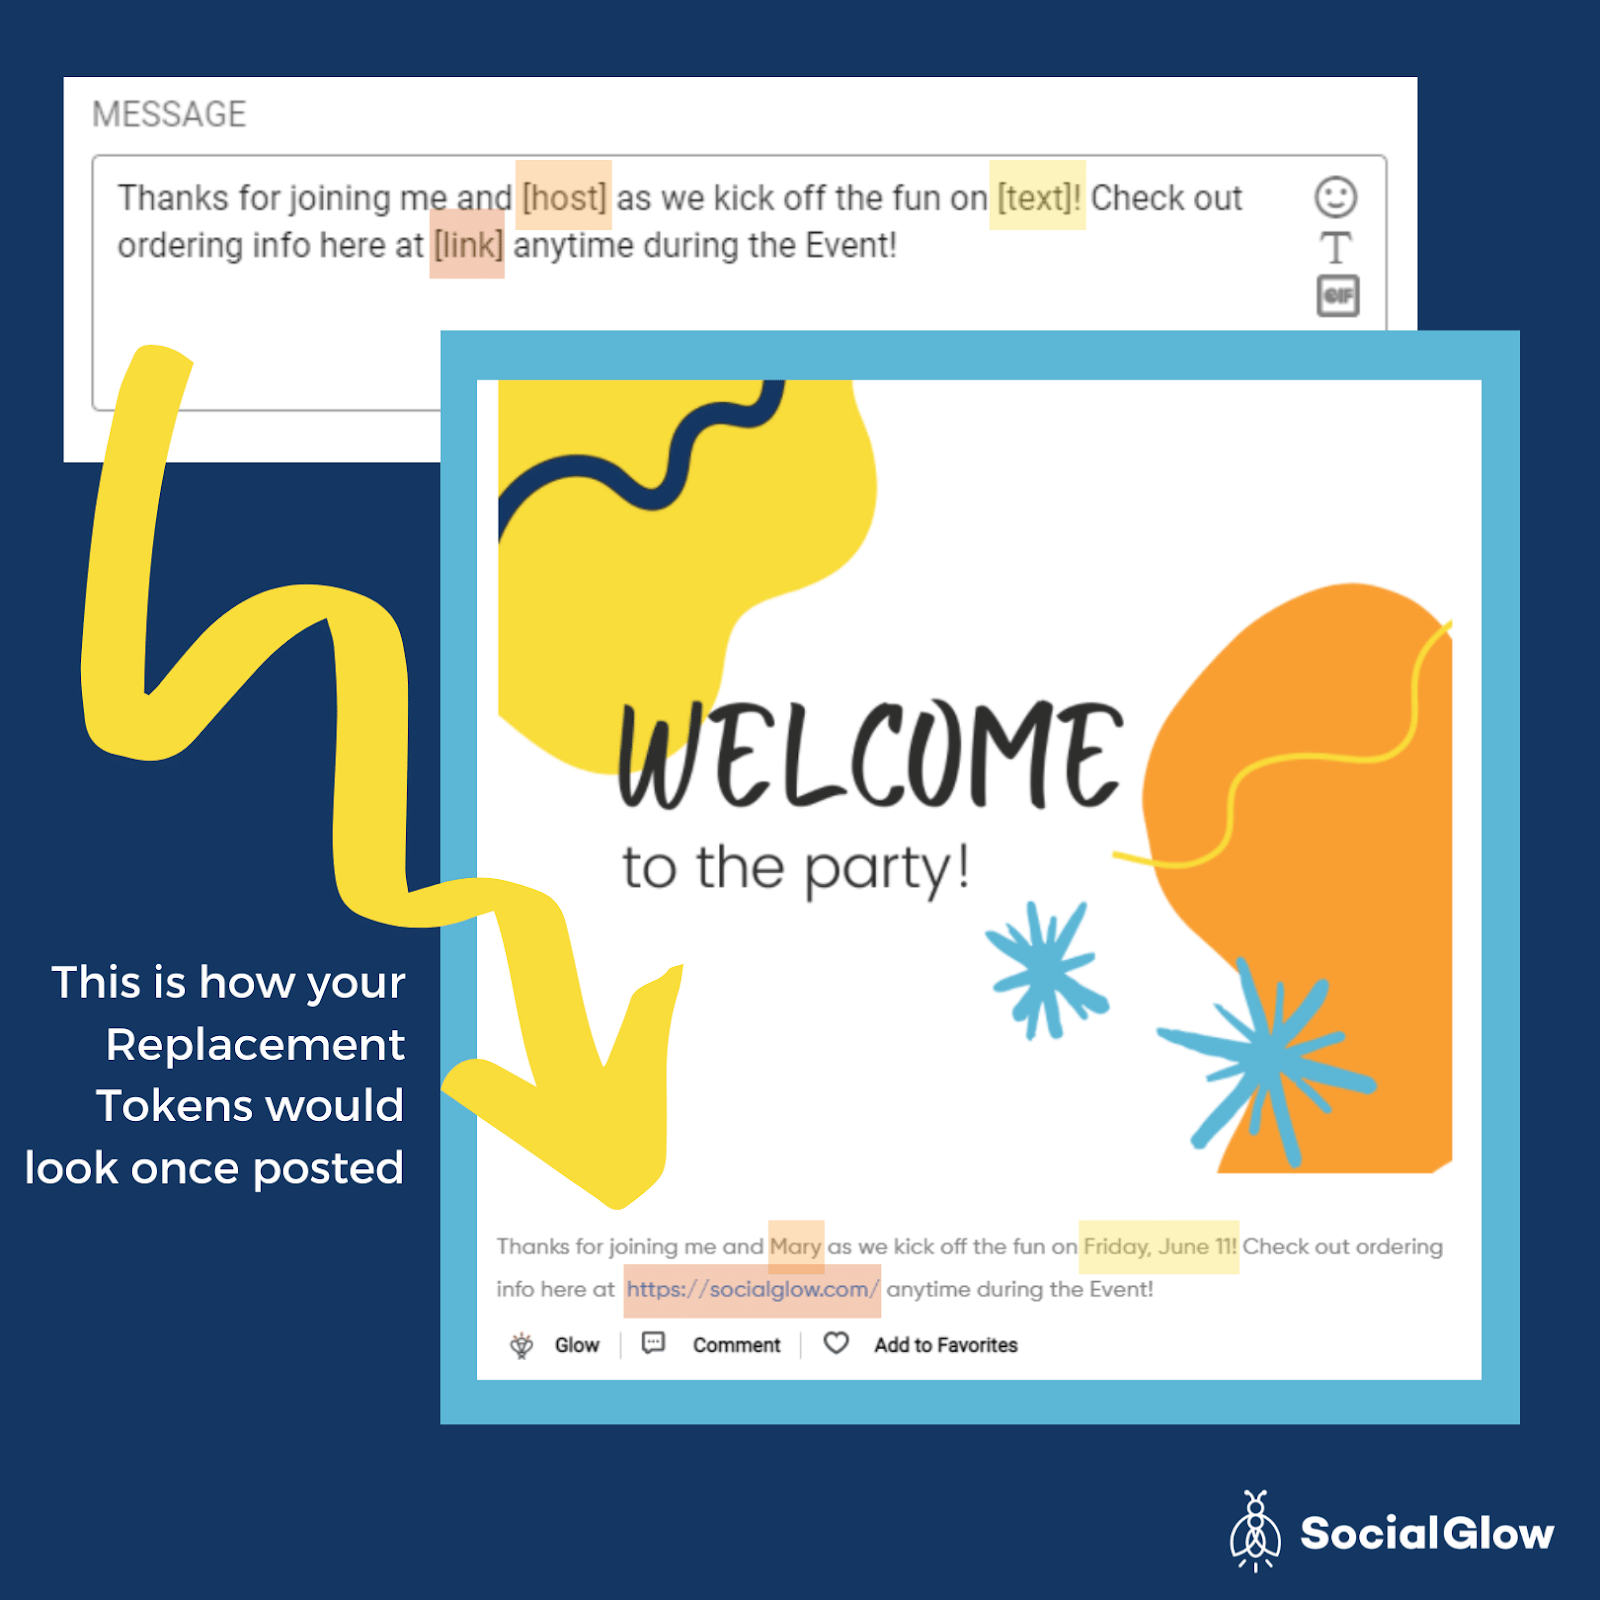
Your posts in your Template can feature Web Links, Pictures, and Videos. Plus, you can use the Replacement Token feature to customize your Template posts depending on which Group it is scheduled to post. It automatically inserts the text of your choice (without the extra work) for every Group you run.
If you are scheduling content into your groups, you’ll be able to use the Content Calendar Feature and see which posts are prepared for what day. You can organize the interface by week or month. This is a quick way to see all your content in all your Groups in one place. You can also pick which Groups you want to see on the calendar. It’s just a handy tool to make navigating your business more seamless. You can also create posts to be added to Groups directly from the Content Calendar. So you don’t have to go into each group to post. You can post straight from your main command center.

Creating your post through the calendar will look the same as if you were making a post in a Template or directly in your Group. At the bottom of the Post Editing Suite, you’ll see the option to limit the number of comments, lock the comments at a scheduled time or only allow one comment per person. Just another way SocialGlow embeds the option to customize your Courses and Communities that are straightforward and easily accessible.

The fact that customization is so easy on SocialGlow allows you to manage your Courses and community the way you need, rather than trying to fit your business to fit someone else's structure.
When you invest in a platform like SocialGlow that will help you manage the essential aspect of your business in one place - you'll get to create and build your business the way that makes sense to you, faster and with ease!


